How to Transition to Teaching Virtually
Whether you call it distance learning, virtual teaching, or remote teaching, the end result is the same. Somehow we must figure out how to teach our students using a screen. Transitioning from teaching in person to teaching digitally online is no easy feat. Many of us have been pouring over as many resources as we can find. Here's my approach to the transition of teaching in person to teaching virtually.
Pretty sure it's safe to assume that most of us did not learn how to teach virtually when we were in college. Spring of 2020 nearly blindsided us and we were thrown into the deep end with distance learning. Most of us were in survival mode, just trying to keep our heads above water.
Now that a new school year is upon us, and it is clear our battle with the pandemic is far from over, we must recognize the new place virtual learning has in our education curriculum.
How do we do that? And what does it look like?
Districts across the nation are taking different approaches. Anywhere from attending in person, attending virtually, a hybrid of the two, and even bouncing between. While we as teachers sit on pins and needles wondering what school boards will decide for us. And worry about what we should be planning for.
What I'm about to share with you in this post, is my approach to transitioning from a traditional classroom setting to a virtual setting. I will share with you my thinking and step by step process. This is by no means the only way... it is just MY way, that I choose to share with you. Fingers crossed it makes sense...
If you know me, and have been around the blog, then you know how much I love systems. Let's dive in friends, here is my system for transitioning to teaching virtually.
Planning to Teach Virtually Step-By-Step
Step One: Learn Your Platform
Whether you are using Google Classroom, Zoom, Microsoft Teams, Canvas, or whatever.... you need to learn your platform.
Set up a “fake” classroom with some “fake” students and see what it looks like. Then you need to practice. Send assignments, and then log in as a “student” so you can see what they see. Just like when we were first learning to teach face-to-face with internships and watching our mentors, you need to do the same to prepare to be a virtual teacher.
As you practice with your “fake” classroom of students, do yourself a favor and write down the steps you expect students to take. Then create a “cheat sheet” that you will be able to distribute to your students.
|
Processes You Need to Write Out for Your Students Include:
Logging in to your computer/chromebook/platform Connecting to your virtual class video sessions Finding directions for the day/week work Finding assignments Explain how you label assignments How to turn in assignments How to participate in virtual classroom – asking and answering questions How to “work together” if you will do small group video sessions How to take quizzes and tests How do students connect with you if they have questions |
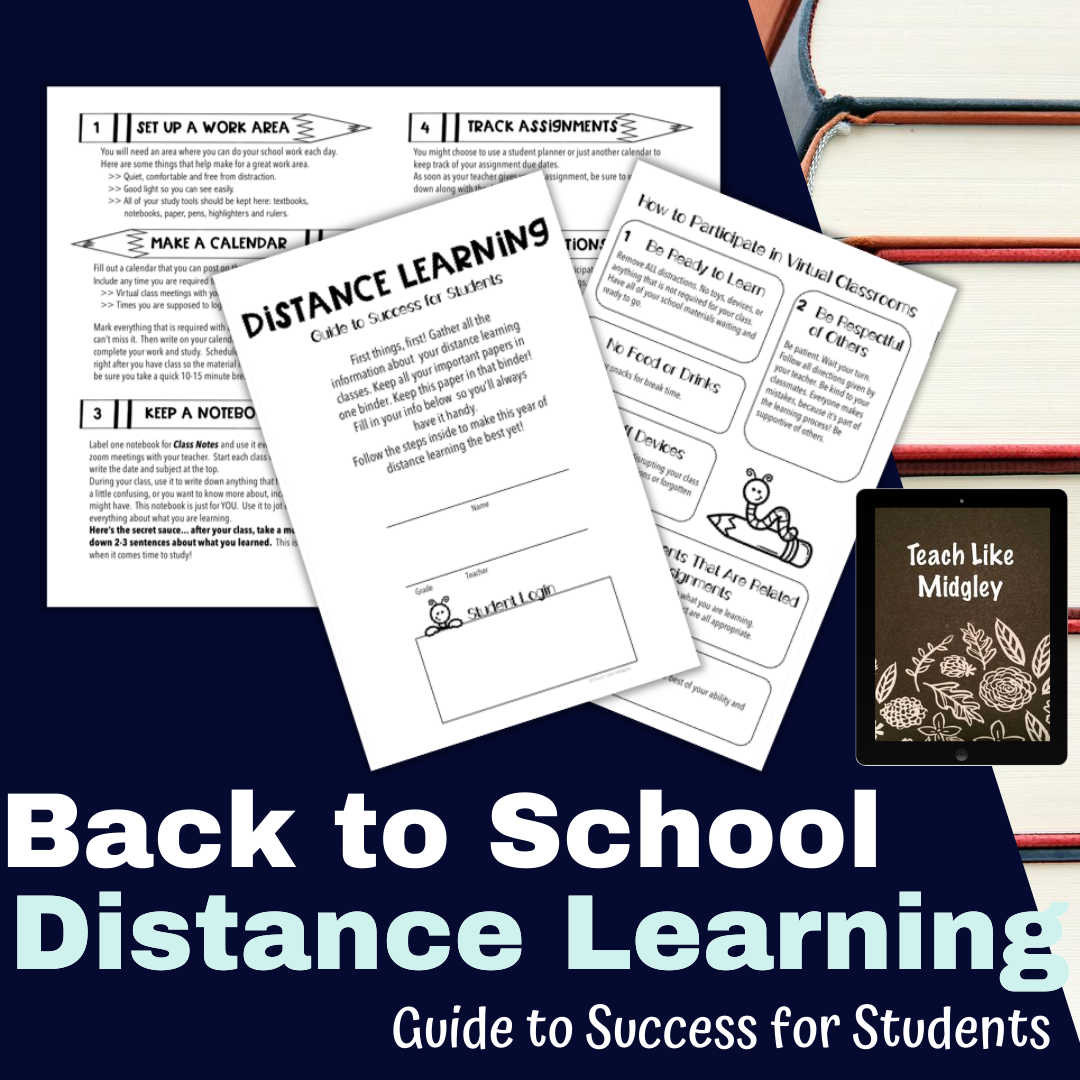
You may also want to consider giving your students some general guidelines for how to be a successful online students. Check out my Distance Learning Guide for Students. Remember that your students are new to all of this too!
Step Two: Consult Your Calendar
Look at your calendar. The most frustrating part here, is that our calendar seems like a wild card right now.
If you can, you want to figure out your schedule for how often you will meet with your students virtually. How many times per week, and how much time will your students have to complete the assignments you will be giving them.
The number of times you will touch base with your kiddos through camera, and how many days students will be expected to complete work independently at home, will definitely drive your lesson planning and determine how you break down your curriculum.
However, don’t get too caught up in what has to be done face to face vs independent.
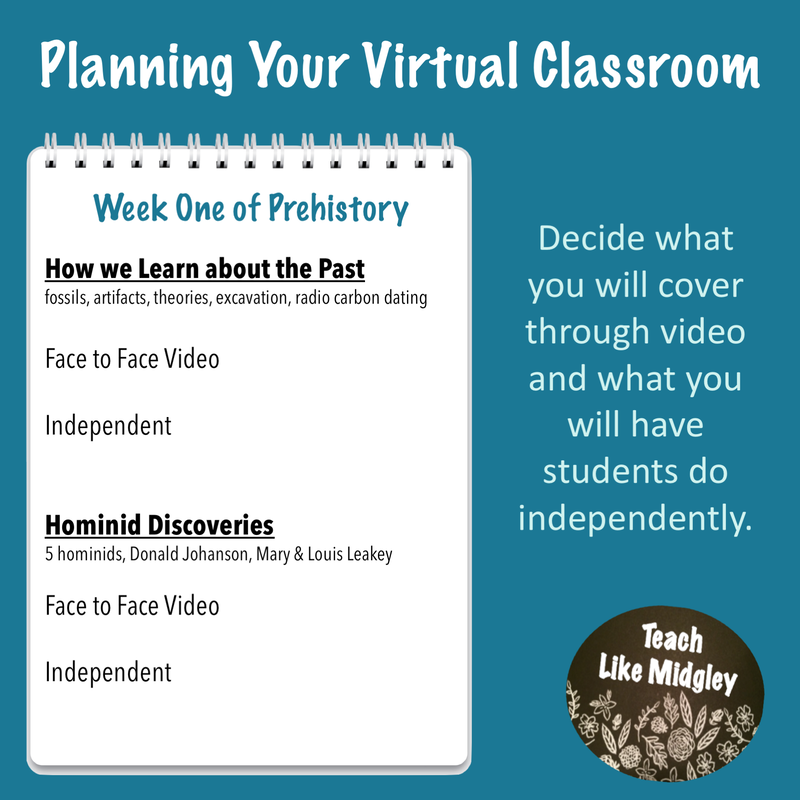
Even if you have a new objective for your students on a remote day, you can always record an instructional video for them. Although you will not be able to take live questions, your students will be able to pause and re-watch the video as much as needed.
A few quick tips on instructional videos:
+ Forget about cute. While cute wall back drops are nice and everything, they ultimately do not make a difference when it comes to instructing students. So stop worrying so much about your back drop. In fact, you may find the best back drop for your virtual instruction is a white board. If you have one, great! If not, consider a DIY. Just pick up a cheap poster board frame. Take the picture the frame comes with and turn it backwards, which will leave you with a white page. Grab a dry erase marker and you’re good to go.
+ Try to keep your video 10-12 minutes long at the most. That’s about the best you can hope for when you are not there to redirect your students’ attention.
+ No fancy equipment needed. Just use the software you already have on your computer.
If you can, you want to figure out your schedule for how often you will meet with your students virtually. How many times per week, and how much time will your students have to complete the assignments you will be giving them.
The number of times you will touch base with your kiddos through camera, and how many days students will be expected to complete work independently at home, will definitely drive your lesson planning and determine how you break down your curriculum.
However, don’t get too caught up in what has to be done face to face vs independent.
Even if you have a new objective for your students on a remote day, you can always record an instructional video for them. Although you will not be able to take live questions, your students will be able to pause and re-watch the video as much as needed.
A few quick tips on instructional videos:
+ Forget about cute. While cute wall back drops are nice and everything, they ultimately do not make a difference when it comes to instructing students. So stop worrying so much about your back drop. In fact, you may find the best back drop for your virtual instruction is a white board. If you have one, great! If not, consider a DIY. Just pick up a cheap poster board frame. Take the picture the frame comes with and turn it backwards, which will leave you with a white page. Grab a dry erase marker and you’re good to go.
+ Try to keep your video 10-12 minutes long at the most. That’s about the best you can hope for when you are not there to redirect your students’ attention.
+ No fancy equipment needed. Just use the software you already have on your computer.
Step Three: Consider Your Curriculum
If you’ve read other blog posts of mine, you’ll know that I highly recommend calendar planning first, then unit planning, before going to lesson planning.
Not sure what I’m talking about? Check out these posts.
How Calendar Planning Saved My Sanity
Lesson Plan Your Year Like A Pro
Lesson Planning Ancient Civilizations the Easy Way
I still recommend doing this. However, maybe with a slightly different approach. Since Ancient Civilizations are my total favorite, I will use it as an example.
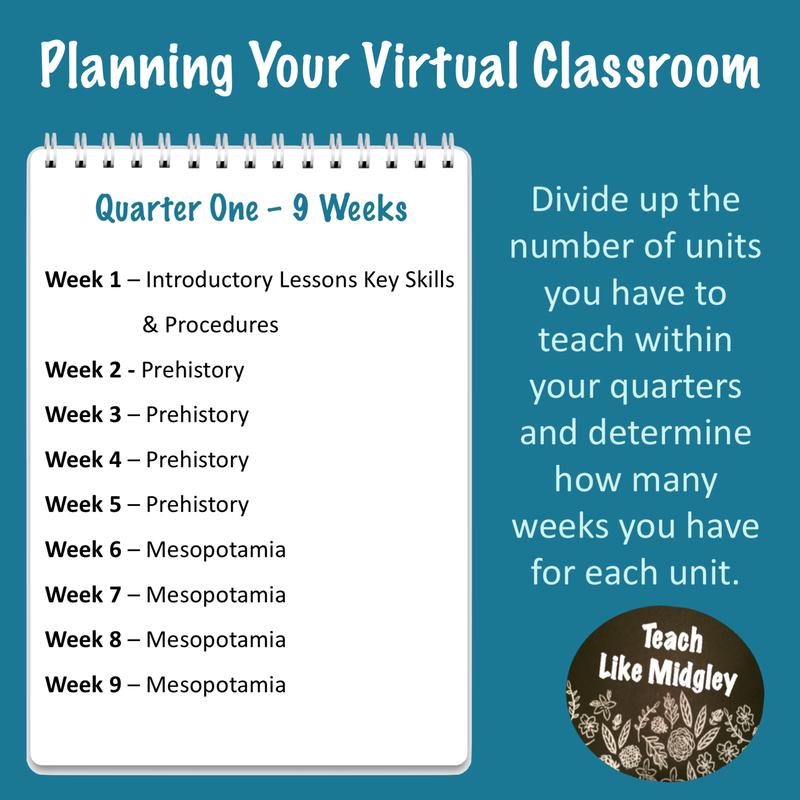
Definitely break down your curriculum by which units you intend to cover each quarter.
Q1 – Prehistory, Mesopotamia
Q2 – Egypt, India
Q3 – China, Greece
Q4 – Rome, Americas
Then break down how many weeks you intend to spend on each unit.
Q1 – 9 Weeks
Week 1 – Introductory Lessons Key Skills & Procedures
Week 2 - Prehistory
Week 3 – Prehistory
Week 4 – Prehistory
Week 5 – Prehistory
Week 6 – Mesopotamia
Week 7 – Mesopotamia
Week 8 – Mesopotamia
Week 9 – Mesopotamia
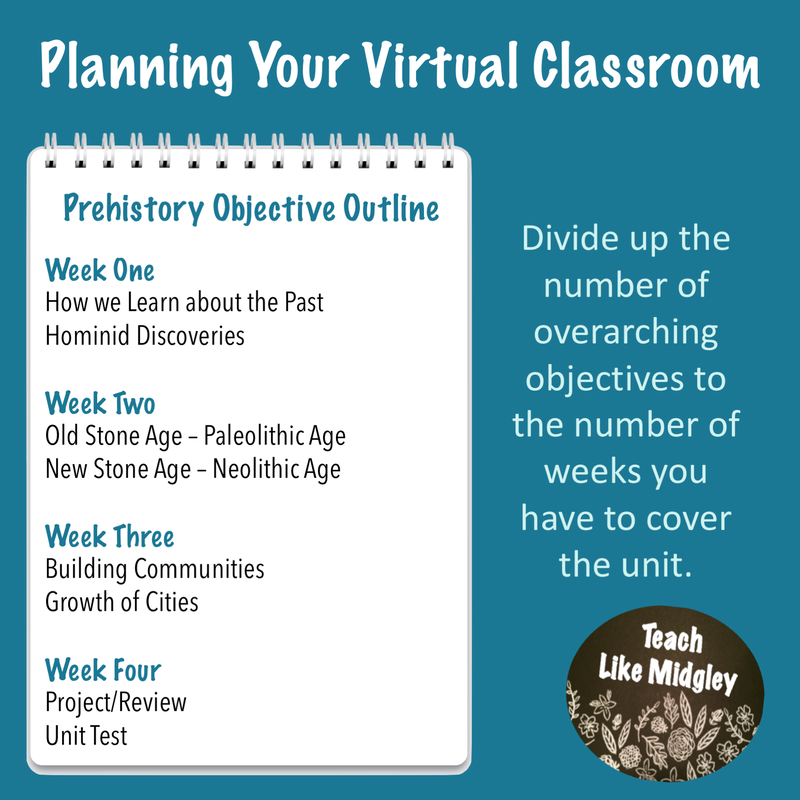
Next, break down each unit by key learning objectives.
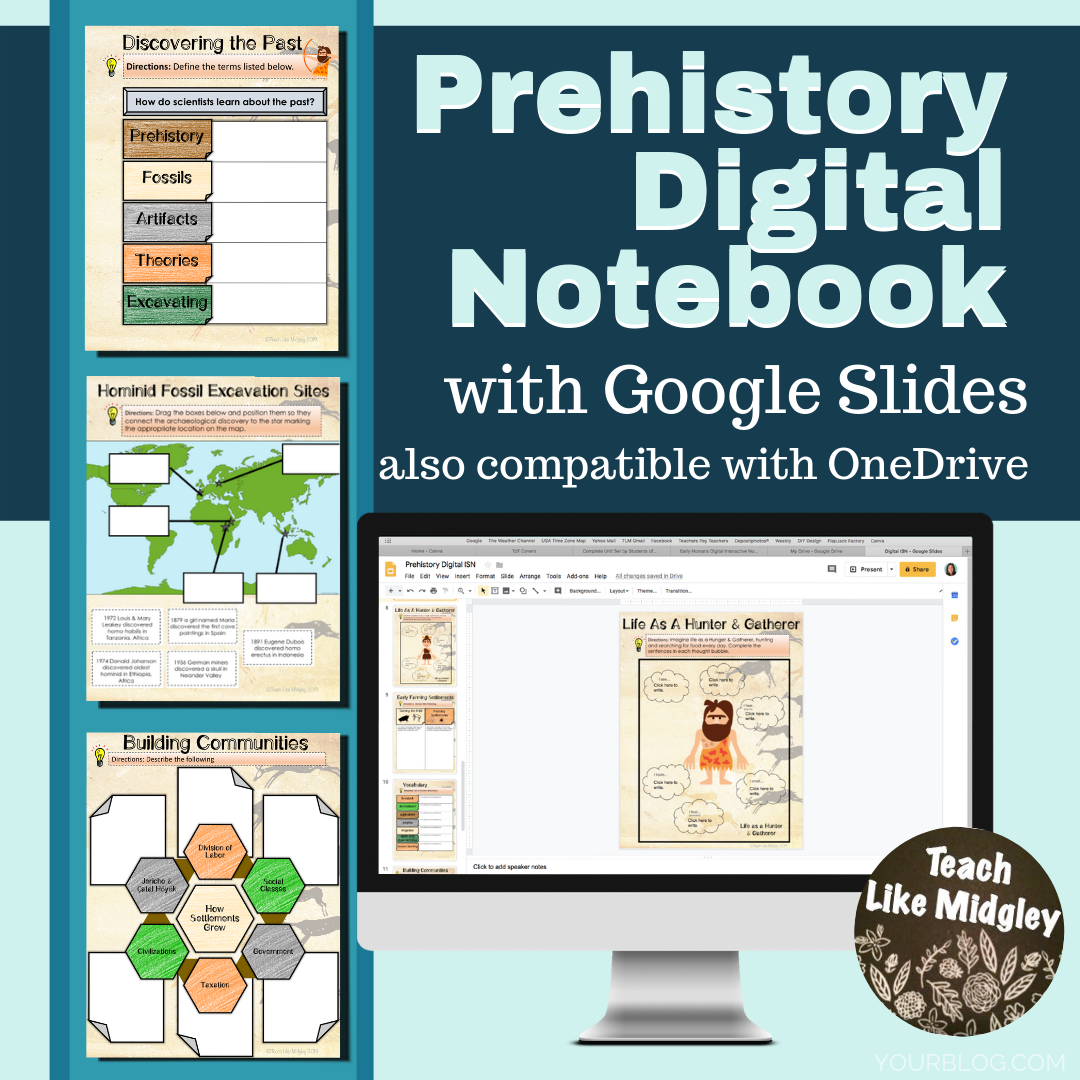
Prehistory
+ How we learn about the past
+ Hominid Discoveries
+ Old Stone Age – Paleolithic Age
+ New Stone Age – Neolithic Age
+ Building Communities
+ Growth of Cities
If you need help identifying the overall learning objectives for each unit, check out my ancient civilization unit planning checklists.
There is a Done-For-You Ancient Civilization Checklists in my TpT Store.
As I try to line up these objectives with my instruction, I would first consider when I want to give my unit test or culminating activity.
Let’s say I want to give my test on Thursday of the final week and do something fun on Friday to wrap up the unit. I will also throw in a review day on that Wednesday. And I can’t forget to do a fun introductory activity on day one.
So, that gives me 16 days to cover my 6 learning objectives.
I would next look at how many days I wanted to use to cover each objective.
My initial thought would be to spend 2 days on each objective – one face to face and one remote where students work independently.
That would allow me to cover 2 major objectives per week, and leave Friday to help students with recap, making connections, and/or doing a small application of skills or games.
Not sure what I’m talking about? Check out these posts.
How Calendar Planning Saved My Sanity
Lesson Plan Your Year Like A Pro
Lesson Planning Ancient Civilizations the Easy Way
I still recommend doing this. However, maybe with a slightly different approach. Since Ancient Civilizations are my total favorite, I will use it as an example.
Definitely break down your curriculum by which units you intend to cover each quarter.
Q1 – Prehistory, Mesopotamia
Q2 – Egypt, India
Q3 – China, Greece
Q4 – Rome, Americas
Then break down how many weeks you intend to spend on each unit.
Q1 – 9 Weeks
Week 1 – Introductory Lessons Key Skills & Procedures
Week 2 - Prehistory
Week 3 – Prehistory
Week 4 – Prehistory
Week 5 – Prehistory
Week 6 – Mesopotamia
Week 7 – Mesopotamia
Week 8 – Mesopotamia
Week 9 – Mesopotamia
Next, break down each unit by key learning objectives.
Prehistory
+ How we learn about the past
+ Hominid Discoveries
+ Old Stone Age – Paleolithic Age
+ New Stone Age – Neolithic Age
+ Building Communities
+ Growth of Cities
If you need help identifying the overall learning objectives for each unit, check out my ancient civilization unit planning checklists.
There is a Done-For-You Ancient Civilization Checklists in my TpT Store.
As I try to line up these objectives with my instruction, I would first consider when I want to give my unit test or culminating activity.
Let’s say I want to give my test on Thursday of the final week and do something fun on Friday to wrap up the unit. I will also throw in a review day on that Wednesday. And I can’t forget to do a fun introductory activity on day one.
So, that gives me 16 days to cover my 6 learning objectives.
I would next look at how many days I wanted to use to cover each objective.
My initial thought would be to spend 2 days on each objective – one face to face and one remote where students work independently.
That would allow me to cover 2 major objectives per week, and leave Friday to help students with recap, making connections, and/or doing a small application of skills or games.
|
|
|
Step Four: Lesson Planning
Now that you have an outline of a plan, you can start to focus on details. Avoid overwhelm by taking it one week at a time and one objective at a time.
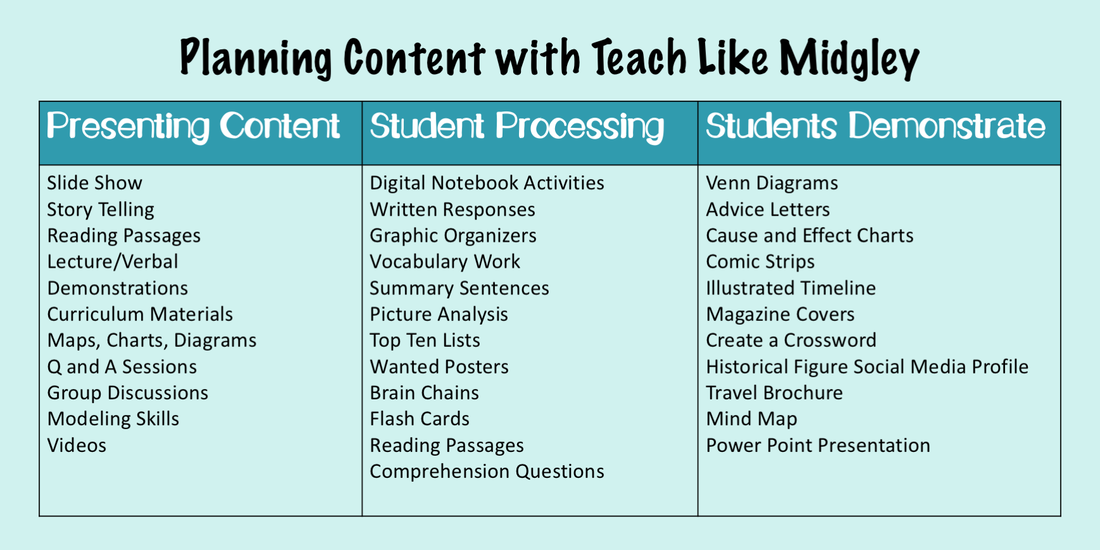
Just like you would if you were planning to teach in a regular classroom environment, you will need to decide 3 things as you plan.
1) How will you present the information to your students.
2) How will your students process and practice with the information.
3) How will your students demonstrate their knowledge.
Use these ideas to help you...
Step Five: Teaching Multiple Classes
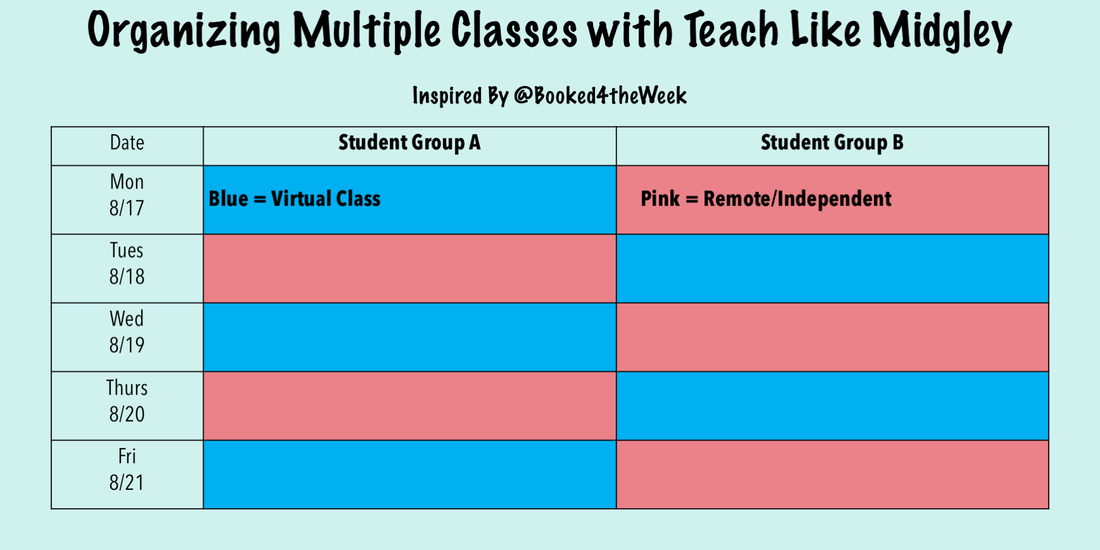
If you are teaching secondary, then chances are you will be teaching multiple groups of students. You will need to take into consideration that each class of students may have a slightly different schedule.
@Booked4theWeek shared in her Instagram Story a great organizer that she is using to keep it all straight. You may want to consider something similar, that fits your needs. I don't have her exact format, but it looked similar to this, and was color coded.
@Booked4theWeek shared in her Instagram Story a great organizer that she is using to keep it all straight. You may want to consider something similar, that fits your needs. I don't have her exact format, but it looked similar to this, and was color coded.
Step Six: Provide Structure for Students
I encourage you to find a structure that works for you, and go with it. Any structure is better than no structure. You may find you need to tweak your process a bit, which is completely normal.
Not only do you need a structure to help you plan, but your students also need a structure that helps them know what to expect. You will also find your students are more engaged and have more follow through on project completion when they know how everything connects together.
Here's an example of what I would put together for students and have posted on my virtual platform.
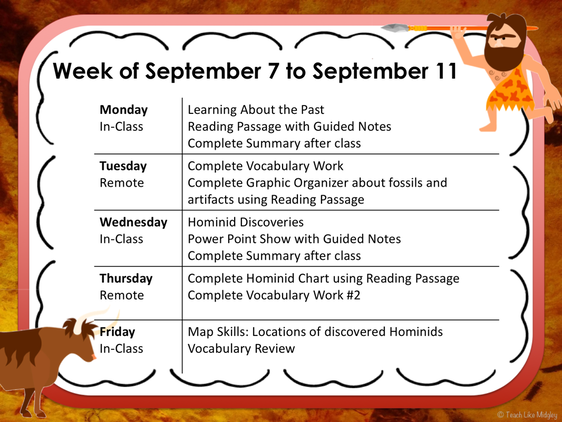
If you are loving this prehistory themed slide, it is part of my editable Prehistory Themed PowerPoint Slides.
Final Thoughts
This is just my approach to transforming my teaching to a virtual setting. As I mentioned before, there are lots of ways you can tackle this challenge. But as a NO FRILLS teacher, I implore you to set the cutesy frilly fun stuff aside... for now. Focus on the big picture and getting your systems in place. The fun frills can come later.
You may also want to check out this AMAZING post by Elementary at Heart. You just might find a few more helpful tidbits!
You may also want to check out this AMAZING post by Elementary at Heart. You just might find a few more helpful tidbits!
If you're interested...
|
|
|
Welcome! I'm Hillary Midgley, a veteran 6th grade teacher.
I create educational materials and develop curriculum for other teachers. I specialize in teaching students how to learn through my Study Skills Curriculum. I have established fundamental classroom systems and structures for teachers to help them streamline their classroom. And my passion is teaching ancient history through engaging activities with foundations in academic skills. Here you will find resources on all of these topics and more. Learn more about me here.
Let's Connect...

|

|
|

|
You May Also Like...
|
|