3 Savvy Activities for Teaching
Ancient Egypt Timelines
The first time students encounter timelines is often in 6th grade, when they begin to learn about ancient civilizations.
Students often need a lot of practice to understand the concept, before they are able to use them in conjunction with studying history.
When I first started teaching ancient history with little guidance and no curriculum, it never really occurred to me that I needed to teach timeline skills. It wasn’t until students were frustrated and confused that I realized I missed this essential skill.
Honestly, I am surprised at how few resources are really out there for giving students practice with these skills. I often see worksheets that ask students to “put events in order on the timeline” or a cut out and arrange events in order sort of activity. But thinking critically about what is on the timeline itself and actually using it... there seem to be few out there.
Even though we can easily relate a timeline to a positive and negative number line, throw in not one, but two types of labels and students can quickly get overwhelmed even more.
In this post, I’m going to share with you 3 savvy activities for teaching ancient Egypt timeline skills.
Even though we can easily relate a timeline to a positive and negative number line, throw in not one, but two types of labels and students can quickly get overwhelmed even more.
In this post, I’m going to share with you 3 savvy activities for teaching ancient Egypt timeline skills.
#1 Coding Techniques
The school year starts with an introductory lesson, where we lay out a basic number line and take a few notes.
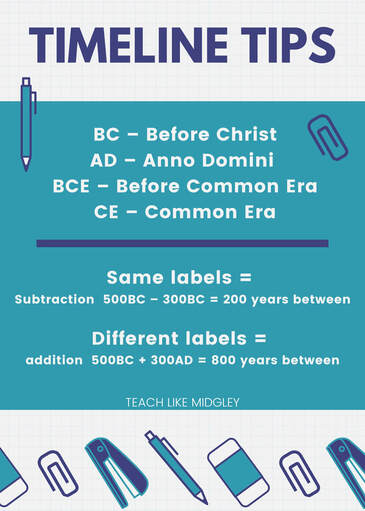
We discuss what each set of abbreviations stand for:
BC – Before Christ
AD – Anno Domini (Latin) which translates to: “In the year of the Lord”
BCE – Before Common Era
CE – Common Era
It is crucial to address both sets, because they will see both sets in our various resources throughout the year.
It also helps to put various dates on index cards, and have students stand with the cards in chronological order.
You can relate timelines to negative/positive number lines, only clarify that we are using letters instead of +/- signs.
Here’s where the coding strategies really start. Understanding how to do that math that goes along with timelines is often what confuses students the most. Point out that if they want to know the number of years between two dates, to use this idea to help remember the math:
Same labels = Subtraction 500BC – 300BC = 200 years between
S stands for Same AND Subtraction
Different labels = addition 500BC + AD300 = 800 years between
The second part of coding, involves using two different colors for the two separate sides of the timeline.
Create a timeline on two separate pages – the left side on one page and the right side on the second page. Then photo copy them on two different colors of paper. Cut them into strips, so each student gets a strip of each color. Then have students lay the two side by side on their desk to make a complete timeline.
The color coding serves as an excellent visual for your learners that need to see the distinction between the two different sides.
#2 Adding the Current Year
It took a little time before I learned this handy trick. I was so frustrated the first few years of teaching timelines because every year I would have to edit the document I was using to make it say the current year. This was also true for my tests. Ugh. No fun.
I finally realized that I was actually doing my students a disservice by always having the current year on the timelines we were using in class.
Rarely do you ever come across a timeline in a textbook or resource that has the current year labeled. Sure, sometimes it would say today, but unless it was published that current year, you just aren’t going to see it.
I realized I need to teach my students how to handle this on their own, if I wanted them to find success with timelines.
As part of our first lesson, I teach students how to identify the most recent part of the timeline and to actually draw in the current year for their reference. Now don’t panic, I obviously did not teach them to write in books... But for students who really need the visual, post-it notes work great.
Part of our regular timeline skill practice now includes identifying where the present-day mark would go on the timeline for reference.
Now my students have improved their skills and I don’t have to spend time editing my papers and tests each year – Score!

#3 Timeline Complexity Progression
There are so many opportunities to use timelines with ancient Egypt!
The most successful approach I’ve found is using these timelines in a particular progression.
Start with the basic timeline, one that includes maybe 6 events. Have students complete basic tasks with the timeline.
Progress to a timeline that uses a few more events, maybe 10-12. Have students complete tasks that help them to see relationships between events.
Next, present students with a parallel timeline. For ancient Egypt, having the 3 kingdoms on one timeline with a dozen or so events on the other, can help students make connections between the two.
Finally, introduce timelines of events that are separate, but connected to, ancient Egyptian history. Examples include using a timeline for ancient Nubia and Kush, or a timeline of ancient African Kingdoms.
The best part of this approach, is that you can have students' progress through timeline complexities as appropriate for their skill levels.
Ready to Roll Materials
Now that you have a few new savvy activities up your sleeve for working with students on ancient Egypt timelines, you are ready to get started!
Use coding techniques, teach students to add the current year to the timeline for reference, and introduce students to timelines by strategically using levels of complexity.
If you are not a DIYer, or just don’t have the time and you are looking for done-for-you materials, then you can check out ancient Egypt timelines here:
Basic Ancient Egypt Timeline Practice
Ancient Egypt Parallel Timeline Practice
Powers that Ruled Ancient Egypt Timeline Practice
African Empires Timeline Practice
Nubia and Kush Timeline Practice
You May Also Like...

Welcome! I'm Hillary Midgley, a veteran 6th grade teacher.
I create educational materials and develop curriculum for other teachers. I specialize in teaching students how to learn through my Study Skills Curriculum. I have established fundamental classroom systems and structures for teachers to help them streamline their classroom. And my passion is teaching ancient history through engaging activities with foundations in academic skills. Here you will find resources on all of these topics and more. Learn more about me here.
Let's Connect...

|

|

|

|